Spotlight of the month:
Even more metrics at your fingertips with Lightspeed Pulse
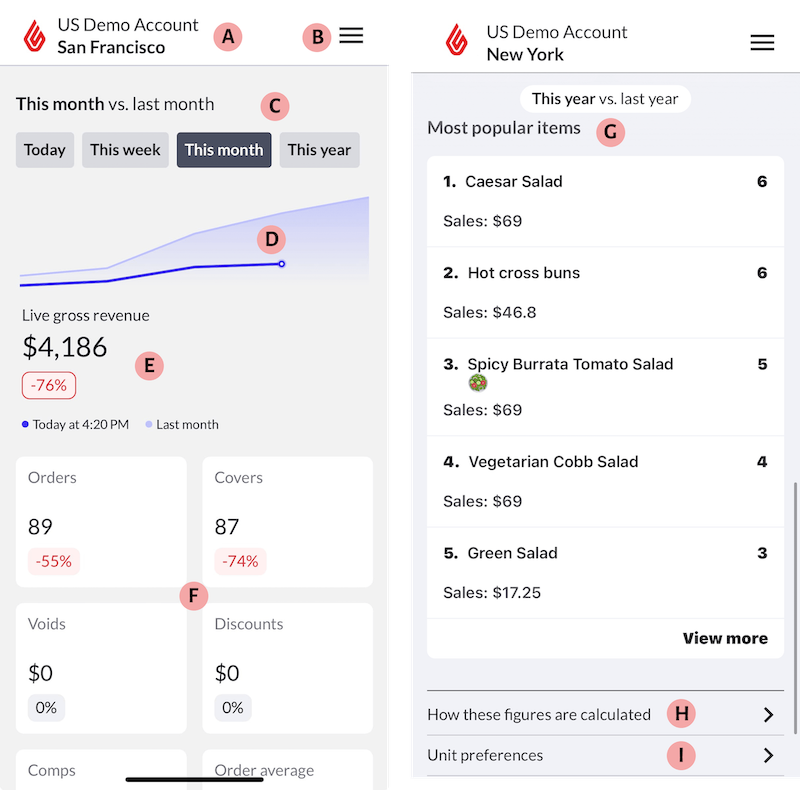
The Lightspeed Pulse app just dropped and we’ve already added even more features and metrics—including all-location view with revenue breakdowns, most popular items, refunds, table turn-time, sales per labor hour and more.
- New: All Locations View is now available for multi-location users to see aggregated data across their locations, as well as each location’s contributions.
- New: Most Popular Items now allows you to view the top ten best-selling items for each location.
- New: Three new metric cards have been added to the Business Location view: Refunds, Sales per Labor Hour, and Table Turn Time.
- New: Users can share a link to download the app from the Help and Resources menu.
- Improved: The sales graph has even more increments to clarify sales changes over time.
Lightspeed Pulse app is currently free for all Lightspeed Restaurant users and available in all supported languages.
New in reporting: Location Summary
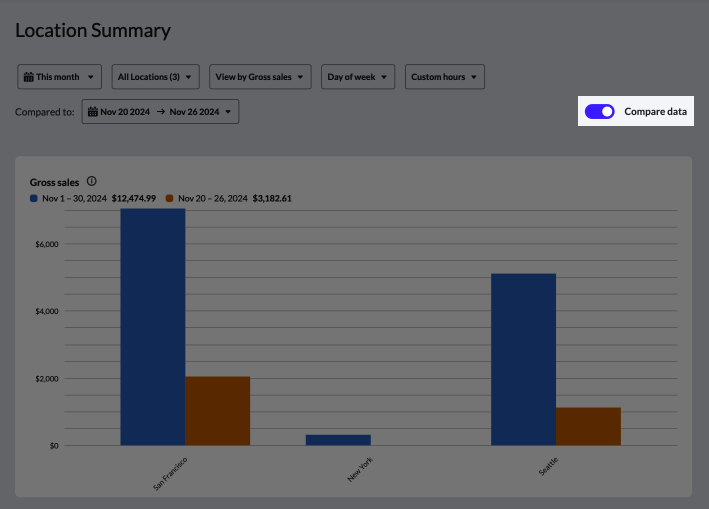
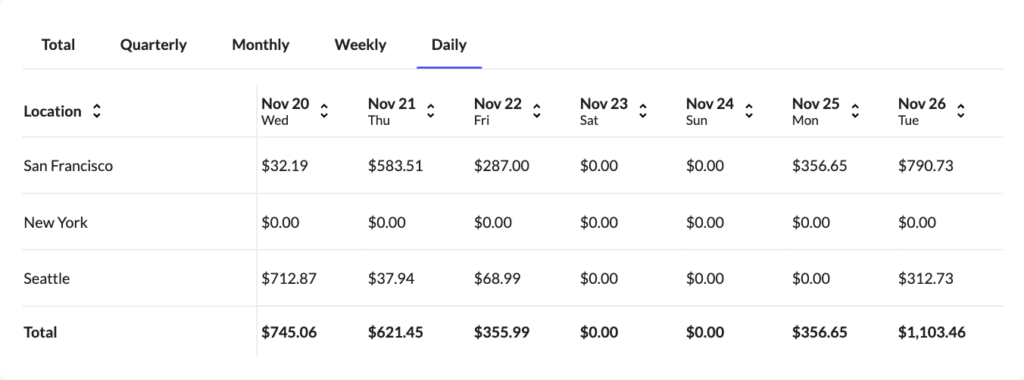
Easily compare sales performance across all locations
Multi-location reporting is here with the new Location summary page! If you are running a multi-location business, for the first time, you can easily have an overview of your sales across all locations, letting you compare up to 12 months of sales metrics at a glance.
How to access: Back Office > Reports > Location Summary
POS Experience: more flexibility over table names and printing
Alphanumeric table names are here!
By popular demand, you can now create alphanumeric table names in Lightspeed. We don’t have to tell you this update will help you easily organize floor plans with multiple zones or revenue centers (because you already told us).
Want to add a prefix to your patio tables to help easily distinguish them from dining room tables? No problem!
Already using alphanumeric table names with your reservation system? No problem! This new update saves you the hassle of updating two systems if you’re moving to K-Series from another platform. Learn more here.
Note: Be sure to update all your linked devices to v24.48 to use this feature.
Go to your Back Office > Configuration > Settings > Floor plans to add or edit tables
More flexibility over refund receipt & kitchen ticket printing
To print or not to print…now there’s an option! You can now:
- Include or exclude the original receipt on refund receipts; and
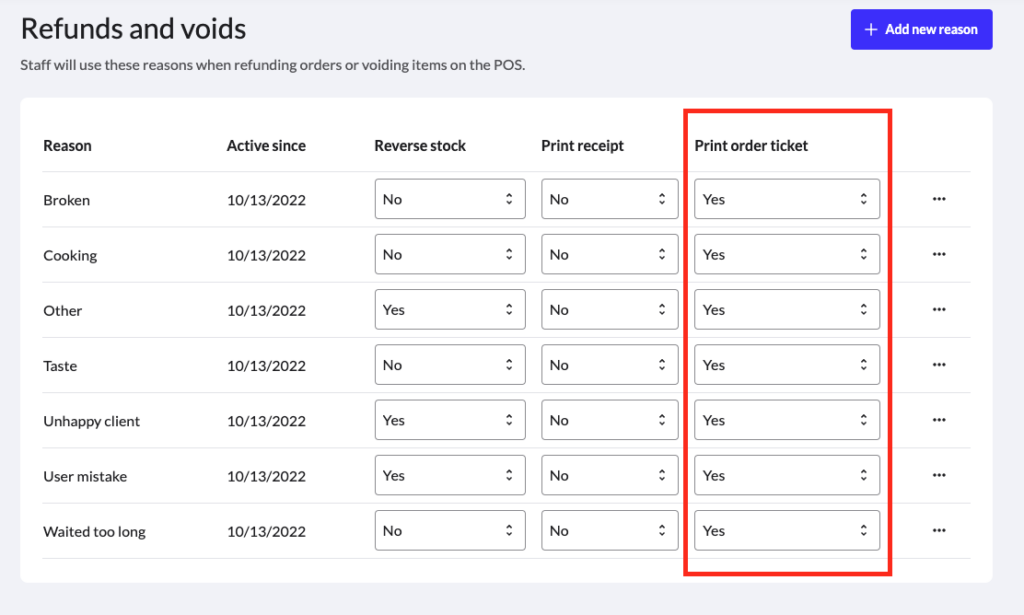
- Enable or disable printing order tickets for voided orders, customizable by void reason.
These updates streamline the receipt and ticketing process, avoid confusion in the kitchen and reduce paper usage based on preferences.
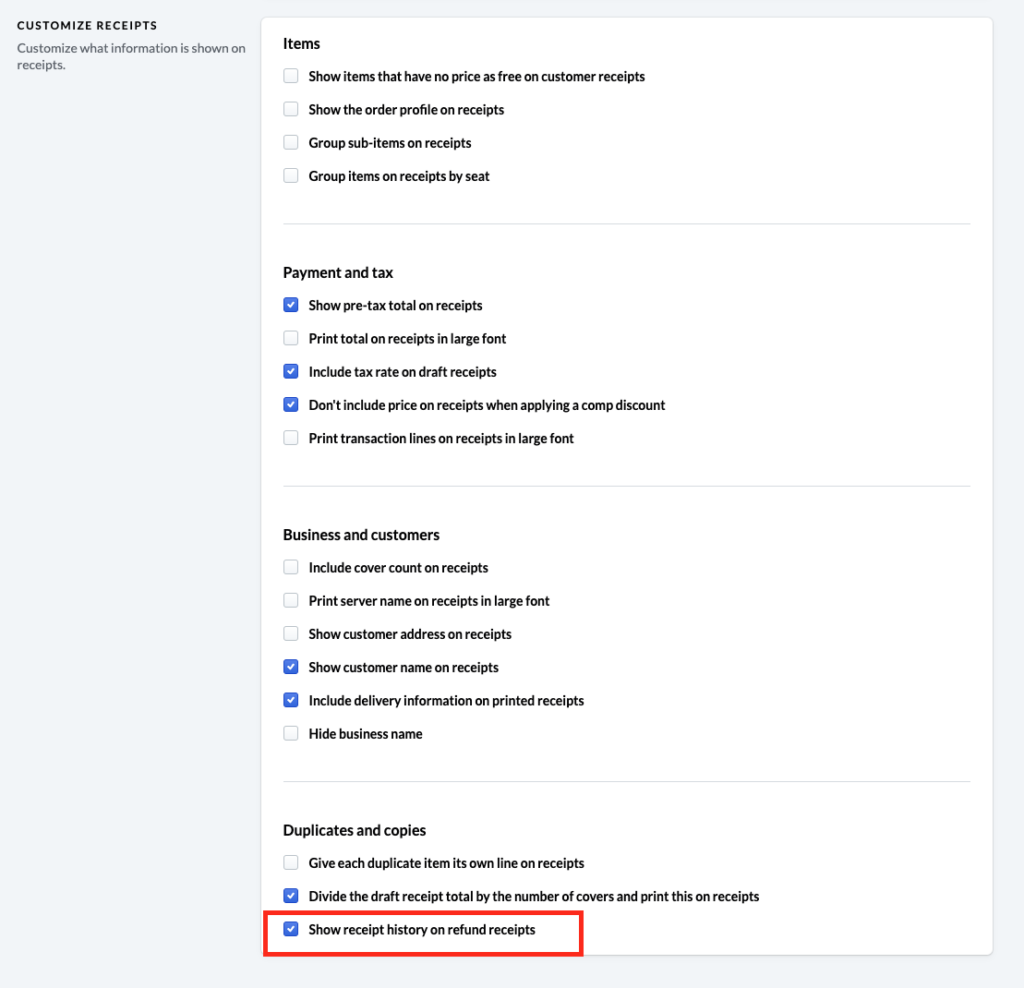
Configure refund receipt: Back Office > Configurations > choose a POS configuration > ‘Receipts’ tab > scroll down to ‘Customize receipts’ section > tick the box ‘Show receipt history on refund receipts’
Configure kitchen ticket: Back Office > Settings > Refunds and voids, and choose to print (‘yes’) or not to print (‘no’) under ‘Print order ticket’ for each void reason.
Back Office: enhanced importing, new home page, and much more
Import allergens and item descriptions
Managing allergens and descriptions is easier than ever with the import feature. Instead of updating each of your items individually, do it all in one go using our import template.
Step-by-step instructions for importing:
- Step 1: Go to your Back Office > Menu Management > Items > Import
- Step 2: Click on Start import and then download the Lightspeed template (available in all supported languages).
- Step 3: Fill out the template.
- Step 4: upload your file.
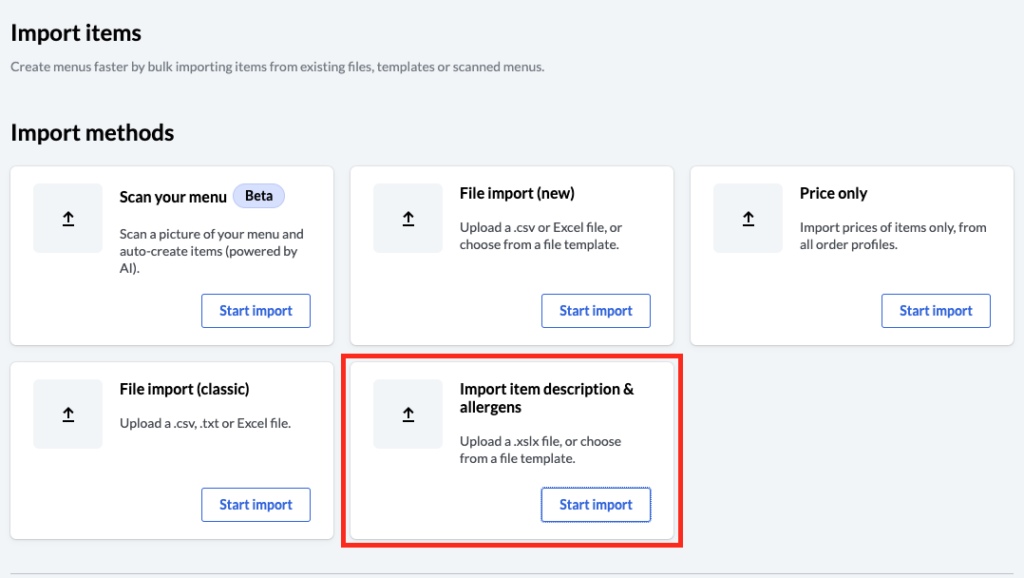
How to use the template? The templates includes two tabs: Allergens and Descriptions. Keep the below in mind while you are filling out the template:
-
- Allergens:
- Only existing allergens can be imported.
- Maximum 9 per line. Add the same SKU multiple times for more allergens if needed.
- Important: this import overwrites existing allergens! Leaving the cell(s) blank will remove allergens tagged in existing items.
- Descriptions:
- Supports up to 3 languages per import (click on the dropdown in the ‘Select a language’ header).
- No need to add any new languages in the Back Office beforehand—new language(s) are activated automatically at the time of import.
- Important: this import overwrites existing descriptions and removes them when left blank!
- Allergens:
New-and-improved Back Office Home page
See your key KPIs by day/week/month/year at a glance. Access quick links to new features, products and funding; get direct Help Center access and explore product release notes to find out what’s new in Lightspeed—all in a sleek, modern design.
Explore the new Back Office home page now
Order routing by profile
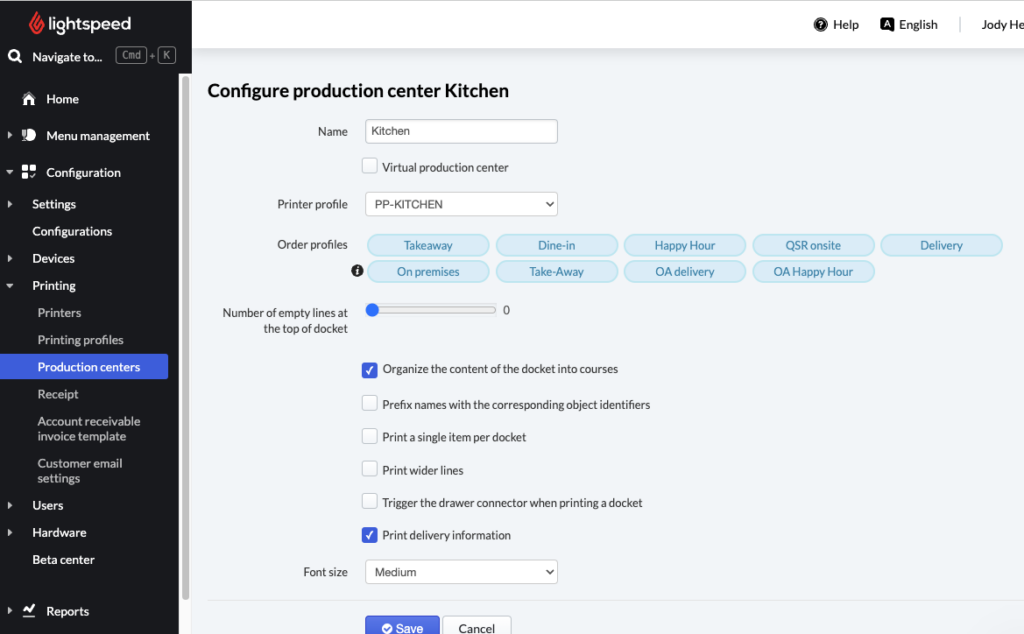
Whether it’s for dine-in or takeout orders, you can now route orders to different printer stations (“production centers”) based on order profiles. With this update, you can choose what order source should be printed where, and enjoy more control and flexibility over their kitchen operations.
Note: You can (de)select one or multiple order profile(s) per production center—so yes, you can have more than one order profile selected! All are selected by default.
Go to your Back Office > Configuration > Printing > Production centers to customize your order routing.
Default option for item groups
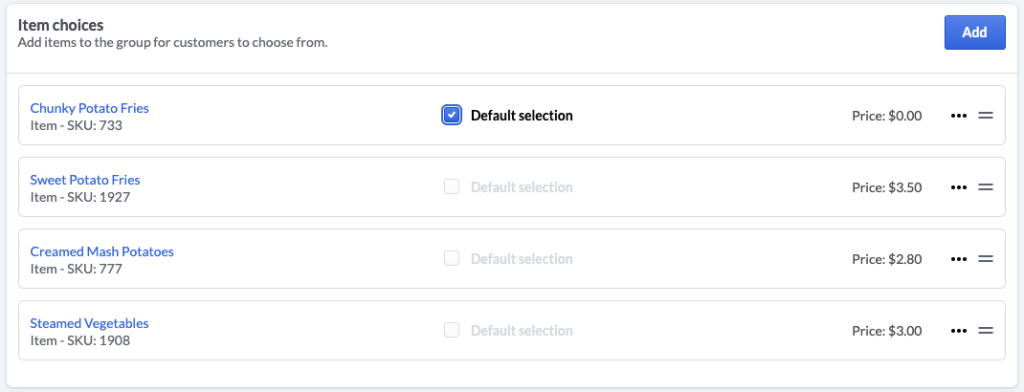
To speed up order-taking, merchants can now pre-select an item within an item group. For example, if 90% of your customers choose fries with their burger, you can set fries as the default to eliminate that extra POS click and speed up service.
To set default options, go to your Item Library > select an item group > tick the ‘Default selection’ box next to the preferred default option.
Note: to use this feature, be sure to update the Lightspeed app to version 24.46.0 or higher.
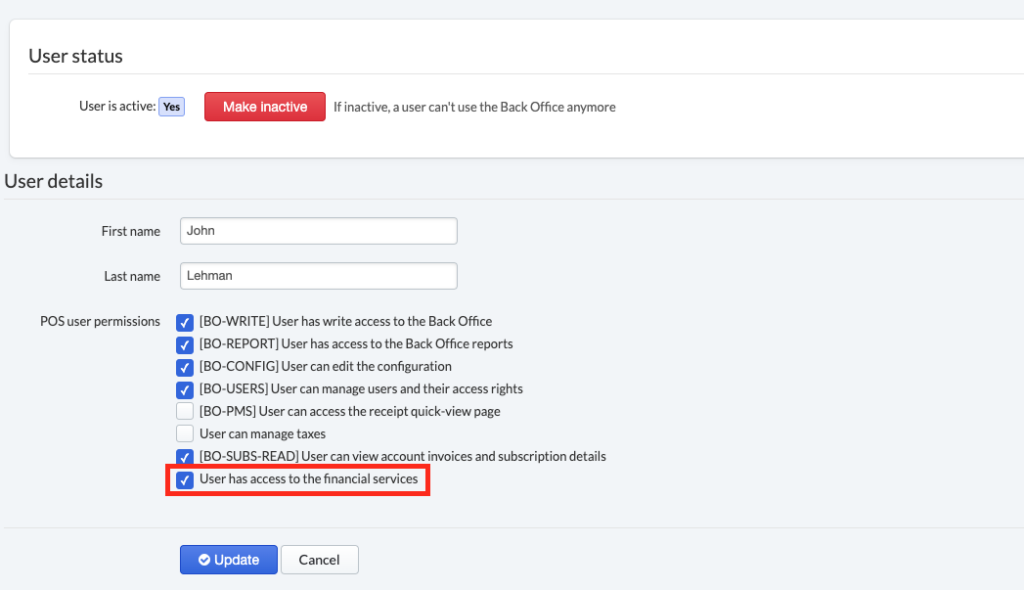
New ‘Financial services’ user permission
You told us that you needed to be able to give certain stakeholders—such as your accountant—access to both your Reports and Financial Services information like your payout reports, etc. But obviously, you didn’t want every back office user to have that kind of visibility.
We heard you—which is why we’ve added a new Back Office user permission, ‘BO-Finance’, which allows you to unhide the Financial Services tab for selected users in the Back Office.
This feature is availabe to Lightspeed Payment users in US, CA, US, CA, AU, NL, BE, CH, DE, FR, GB, IE).
Important!:
- To avoid disruptions, this new permission has been automatically enabled for all existing BO-Config users as a one-time update. To remove access from an individual user, go into their user permissions and untick the “User has access to financial services” box.
- For new users, you’ll need to enable this setting manually by going to Configuration > Backoffice users > select the user and click the ‘Configure’ button beside their name > tick the “User has access to financial services” box.
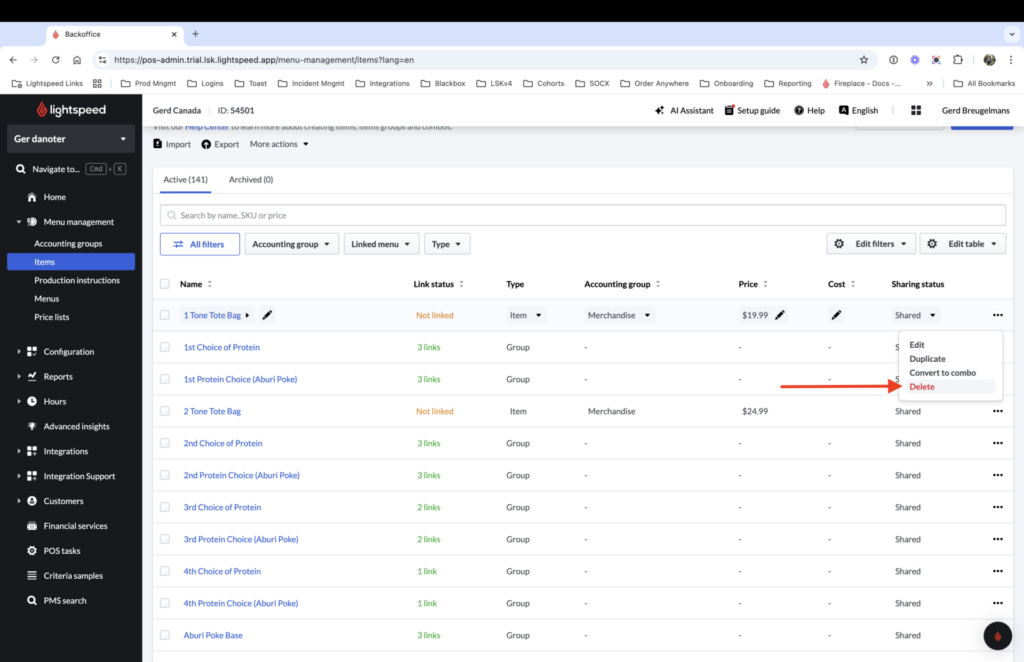
Delete items while in setup mode
Just getting started with Lightspeed? Mistakes happen, especially when you’re just getting set up. Now you can delete options for items, groups and combos while you’re still in setup mode, so you can start fresh with a blank slate.
This feature lets you delete a single item in item details or multiple items at once using a bulk action. A couple of things to note:
- Once your account moves out of ‘setup’ or ‘trial’ mode and into production, items can no longer be deleted, only archived.
- When you delete an item, it can’t be retrieved. If you want it back, you’ll need to recreate it.
View device count and permissions
Now you can find out instantly how many devices you have in use, and how many are permitted for your account—without having to contact customer support! (We love to hear from you, but we know you have other things to do.)
Need to add or remove devices? Simply reach out to your Account Manager.

Kitchen Display System: better coursing experience
New coursing options in Lightspeed KDS
If you haven’t tried our new Kitchen Display System, here’s one more reason to try it out. You can now choose A) to display each course on a separate ticket, or B) to combine all the courses from an order into a single ticket.
If you choose B, each course is displayed in a stack. As courses are completed, the next course moves to the top of the stack, while completed courses move to the bottom. Completed courses are crossed out, but can still be viewed. Learn more in the Help Center.
Try Lightspeed KDS for free for 30 days: go to your Back Office home page to start the free trial!
Online Ordering: customize your delivery zones
Create multiple delivery zones in Order Anywhere
Using Order Anywhere? Now you can define multiple delivery zones with customizable fees and minimum order requirements for each area, so you can reach more customers and increase revenue while protecting your margins on delivery orders.
Create multiple zones by defining geographic boundaries via:
- radius; or
- free shapes (drawing on the maps).
You can even assign colors to your different zones for better visualization. See the step-by-step instructions here.
Go to your Order Anywhere > My profiles, and set your delivery zone under the Delivery tab.
